Showing posts with label NW Letter - Go. Show all posts

Wednesday, May 7, 2025

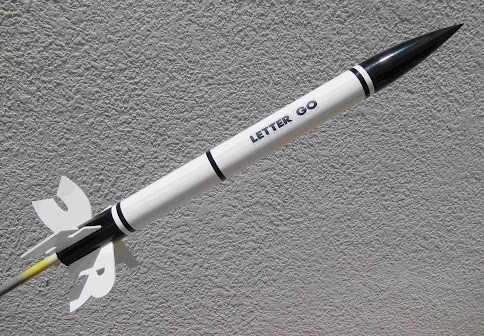
New Way Letter - Go Build, Finished


I can see this model as the perfect, personalized gift for a model rocket enthusiast.

At 22 1/4" tall and BT-60 based, it's tall and burly. A little like a Big Bertha with a twist.


A great model for small fields with a B6-4.

I cut the parachute to 12" diameter, I probably should have gone with a 15 or 18 inch.

Tuesday, May 6, 2025

New Way Letter - Go Build, Part 14, Decal & Parachute


The LETTER GO NAME is a water slide decal.
Before transferring, mark the center lightly with a pencil,


Then mark the center of the white span between the upper two black trim strips.


I set the decal at the pencil marks. I thought it was centered but got it wrong!


It was repositioned using a visual centering.

You are supplied with two LETTER GO decals. I used only one.


The elastic shock cord is tied to the Kevlar line.


The elastic is tied to the nose cone lug leaving a 8" tail. A small metal ring is attached at the end of that 8" tail.

The snap swivel (and parachute) is clipped to the metal ring.

Sunday, May 4, 2025

New Way Letter - Go Build, Part 13, Black Tape Strip Trim

The kit supplies some pre-cut black vinyl trim strips.
When applied on the model the black and white paint pattern reminds me of the Wac Corporal.

The black trim is 1/4" tall. Get an idea of the spacing by setting the strip with 1/4" of the white showing.

The instructions wisely suggest wrapping a strip of paper around the tube for an alignment guide.


Don't peel all of the backing off initially - 
peel back an inch or so, apply and repeat.

Notice the pencil mark. That's the stop and start point directly over the launch lug. I started the strip with a slight overlap in mind so the left end is placed to the side of the pencil mark. 
With the rocket on the launcher and the launch rod in the back, any misalignment of the wrap won't be seen when taking pre-launch pictures.


Here's a better look of the alignment paper and the start (center) of the tape strip.

There is a third wrap strip at the top of the body tube.

New Way Letter - Go Build, Part 12, Fin Masking


According to the face card picture,
the fins will be white, the lower body tube black.

This was a fairly complicated mask, each fin was different.

First the marked Scotch tape lined the root edges.


Brown masking tape covered the rest of the fins.

Before spraying, reburnish the Scotch tape masking strip edges with a Q-tip.


If your root glue fillets were smooth the Scotch tape masks can give a very clean color separation.

I had a few small over sprays. Those were cleaned off with a damp[ magic sponge.

Saturday, May 3, 2025

New Way Letter - Go Build, Part 11, Tube End Masking


I like to keep paint out of the tube ends. Paint can slow a smooth slide of an engine into the engine mount and a nose cone in the top of the body tube.

I rollup a piece of paper towel.


A painting wand is slid into the engine mount.
The paper towel is pushed into the recess below the centering ring.

Cut off the paper towel overlap and press in the end.


I use tweezers to get the paper towel into all the open areas.


On the open upper end with the nose cone removed - 
Some masking tape is rolled around the end of the tube.


Before pressing the tape in the tube,
Press the sticky side of the tape on your pant leg and pull off. This leaves some lint on the tape making it less sticky.

Friday, May 2, 2025

New Way Letter - Go Build, Part 10, The Parachute


Gee, where have I seen this parachute design before?

I'd place the reinforcement disks towards the outside corner of the chute.
The printed placement disk outlines are pretty big.


A toothpick is supplied to punch holes in the plastic.

I like a cleaner assembly so I punch a round hole using the rotary punch.

Set some scrap cardstock under the chute plastic for a clean, round punch. 


The shroud line spool is pretty smart.

Hold the side (over the punched hole) with your thumb and index finger. 
As you pull the red shroud line with your right hand, the spool wobbles back and forth releasing the line. 
No tangles!

I actually enjoy assembling parachutes - 
Especially after I started using ling tweezers to tie the knots.

I use a simple square knot - not a "Granny".
Square knots will not come undone. If you don't know how to tie a square knot: CLICK HERE

Thursday, May 1, 2025

New Way Letter - Go Build, Part 9, Fin Gluing

I applied wood glue to the root edge and to the sides of the TTW (thru-the-wall) fin tabs.
The name letters should read clockwise, to the right.

Note how the letters lean down, like a down swept fin.


I drew an arrow to show how the fin should intersect the centerline of the body tube. 


Here's all five fins viewed from the rear, spelling my first name.
I tried to fill the nose cone seams using medium CA glue and sanding to surface.
Well, the CA glue doesn't stick to this polystyrene plastic!
Filler/Primer and paint doesn't adhere to this plastic either.

Rough up the plastic surface before spray painting with color. 

The upper picture shows a painting "handle" using a wrap of copy paper.

Wednesday, April 30, 2025

New Way Letter - Go Build, Part 8, Sanding the CWF & Filler/Primer


Here's the tube fill after working the CWF into the seams.

I usually hit the filler with 400 grit on a sanding block to start.

Take a close look at the end of the launch lug. That edge is rough and needs same sanding with 400 grit on a block.

On the left, there is already sanded CWF filler in the lug.

After sanding the ends clean, use a sharpened dowel to round the lug and clean up the inside wall. 


Thin strips of masking tape kept the filler primer of the root edge gluing areas.

On the right is the tube after sanding the filler/primer and pulling of the masking tape strips.

Tuesday, April 29, 2025

New Way Letter - Go Build, Part 7, Tube Seam Fill


I like to mark the tube spiral indents with a sharp pencil. It makes them easier to see when applying the CWF filler.


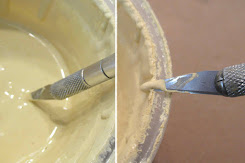
I dip just the tip of my X-Acto knife in the thinned CWF filler.

You won't need much, so wipe the excess off the back of the knife tip.


Run the tip into the seam recess with a back and forth motion. The blade directs the filler into the seam.

I dip and fill about one inch at a time.


I had hoped the plywood fins would only require some filler/primer to fill the very shallow grain.
There were a few "splinters" that needed some CWF and sanding.

Monday, April 28, 2025

New Way Letter - Go Build, Part 6, Filler/Primer On The Fins

The fins are plywood and don't require CWF filling used with deeper balsa grain.

Here I've taped down the fins over the fin tabs, keeping he filler off the wood for a better glue bond.


Here's a fin after spraying with filler/primer.

Note the tab and root edges didn't get sprayed.


After sanding,
there is some filler/primer left and filling the slight wood recesses.


There were a few deeper slivers that needed a bit of CWF and sanding to smooth out.

Sunday, April 27, 2025

New Way Letter - Go Build, Part 5, Engine Mount Gluing

Run the Kevlar line out the back of the engine mount.

I set the engine mount beside the main airframe tube to mark a dowel that will apply a glue line inside the tube. Note the pencil line where the glue will contact the upper centering ring.

Glue was applied to a dowel end and transferred inside the tube.

The mount was slid in with 1/8" of the engine hook exposed out the back end.

A length of heat shrink tubing is supplied to slide over the Kevlar line and down to the top of the engine mount. The tubing protects the Kevlar at the low end from the ejection charge.

To be honest - 
I didn't remember to slide the tube down the Kevlar line!
Here's some shrink wrap on Kevlar before and after being hit with a heat gun.


Considering how hot a heat gun is, the shrink wrap sleeve should give good protection to the Kevlar line 

Roll the Kevlar to keep it out of the way when sliding the mount into place.

The lower centering ring got a glue fillet smoothed out with a Q-tip.

Saturday, April 26, 2025

New Way Letter - Go Build, Part 4, Engine Mount

The upper plywood ring has a engine hook notch.
For added strength, glue in place over the upper bend of the hook.
Notice the Kevlar notch is to the outside of the ring edge to keep the line away from the ejection charge. The upper ring is plywood, strong enough for the ejection pull on the Kevlar line. 


The lower ring is thick cardstock. 

The completed engine mount with the engine block glued in to top.
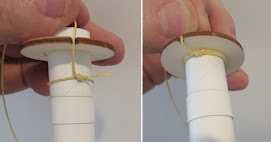
The Kevlar line is knotted tight around the tube.

I've set the knot with a small drop of wood glue.
NEVER use CA glue (Super Glues) on shock cord or shroud line knots. It will make the string or elastic brittle and prone to easily break.

Cut the line with wire cutters.

Here's how the Kevlar sits in the outside notch of the upper ring.

I set the looped line into the centering ring glue fillet. The loose tail is also pressed into the glue.

Friday, April 25, 2025

New Way Letter - Go Build, Part 3, Engine Mount


The bottom edge of the engine mount tube got an interior wipe of CA Glue.

Then the edge got a quick coat.


Then sand the edge square, flat and smooth with 400 grit.


This shows the engine hook retaining ring, not glued on yet.

Always be sure your engine hook runs straight down the tube after gluing the ring over it. The hook can slip around so check it before the glue sets up.


The upper centering ring is plywood.

The fit was a bit loose so I added a thin line of wood glue to the inside edge to get a friction fit.
Let the glue dry before doing a second dry fit.

Thursday, April 24, 2025

New Way Letter - Go Build, Part 2, Cleaning Up The Letter Fins


The letter fins are cut from 3/32" thick plywood.

The edges are slightly laser charred. The flat faces were sanded with 400 grit on a block to remove the ash.
 

On the left - 
is a before and after sanding the fin edge. 

On the right - 
The inside tighter curves were cleaned up using small half round diamond files.


The laser edges are cut with a slight "wedge" cut.

The picture shows the wedge cut sanded down about half way. You can see the angle of the laser cut.
This sanding is most important on the root edges so the fin sits squarely onto the body tube.


Finish up by just kissing down any rough edges with a light pass of 400 grit.
You don't have to put a rounded edge on the fins, just knock off any roughness.