Sunday, November 14, 2021

Rocketship Games MMX Hawkeye, Part 2, Balsa Filling


Normally I would brush on thinned CWF - but these fins are very thin and would probably warp!

I left the fins attached to the sheet for filling.
To keep the coverage thin, I dipped a fingertip in the CWF and rubbed a thin coat over the surface.
I'll worry about the leading and trailing edges later.

On the left is the thin coat of filler.

On the right, I've set the balsa under my Plexiglass sheet to dry. 
After it was dry, there wasn't any warping.

Saturday, November 13, 2021

Rocketship Games MMX Hawkeye, Part 1, Parts

The Rocket Ship Games Hawkeye is a Micro Max version of the OOP Estes kit. 
4 1/2" tall with a 7mm diameter body.


The nose cone is 3D printed and very smooth.
Note the fin alignment lines are lightly laser marked on the body tube.
The red 3D printed piece on the left is the engine block / Kevlar anchor tie.
The fins are laser cut from 1/16" thick balsa.
The "decals" are stickers on clear plastic. The decal edges are "kiss" cut.
The two black tubes are launch lugs. Both are positioned higher on the body under and against the upper vane fins.
Coiled black Kevlar. 
A toothpick (not shown) is included used as a glue applicator for the red engine block.

Friday, November 12, 2021

Rocketship Games MMX Hawkeye, Estes Kit Background


The original Estes Hawkeye kit # 0873 was available from 1986 to 1996. 
The finished model was 8.5" tall. The main airframe tube was a BT-5.
The fins were die-cut cardstock. The two faux motors were rough surface fish paper couplers.
The water slide decals were printed in red, white and blue. 


The original Estes instructions are at Jim Z's: CLICK HERE
This illustration shows the Estes kit water slide decal sheet and two couplers.
Other than the smaller size, there are some differences between the two kits.

The fins in the Rocketship Games kit are 1/16" thick balsa. The Estes kit had cardstock fins.
Notice the runway strip. In the Rocketship Games version it is longer with a center slot. The slot surrounds the Rudder fin root edge. 


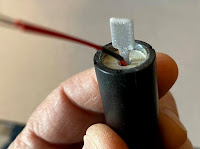
In the original Estes kit, the couplers are even with the low end of the central body tube.

In the Rocketship Games model they are forward of the tube end by about 3/32".

Thursday, November 11, 2021

Estes Green Eggs #7301, Finished


The bottom end is clean - no decals or additional trim.


The large center logo name is a sticker on clear stock.
Handle it using a clean knife blade and wash your hands. Your fingers can leave prints and discoloration  that will be seen under the clear layer.
Like mentioned in some Quest builds - dip a plastic sticker in water before placing it on the body tube. It also helps to wet the body tube where the sticker will be placed.
Wetting the sticker lets you lift and reposition it before burnishing it down. I never get it right on the first try. 
Work out any water bubbles with a soft paper towel. You can also use a damp Q-tip to work out water from under the surface.


Here's a side by side view of two Green Eggs models. 
The Green Eggs is on on the left and the original Scrambler décor on the right. 

The two builds are the same height, there is just some camera distortion.


Wednesday, November 10, 2021

Estes Green Eggs #7301, Finding The Right Paint

Earlier this year I built one of the new Estes Green Eggs egg lofter. 
But - I painted and decaled it in the old Estes Scrambler decor, #701-K-37. 
To see that build: CLICK HERE

That re-drawn decal sheet is available to Patreon subscribers for home printing. Email me at oddlrockets@bellsouth.net and ask for the Scrambler decal PDF. 
The newer Estes Green Eggs design looks like the old Scrambler - well, it's about the same size and the fins are the same shape.

The two builds shown below were done for the Estes Education Department.

The nose cone and (exposed) coupler ring is sprayed with yellow paint.
These two plastic parts had the adapter shoulders masked off. The wrinkled surface is the masking tape.

 
I'm using more of the Ace Premium Spray Enamel now, but they didn't have the shade of green I needed.
The face card picture showed a light green. I found some Rusto 2X Spring Green at Home Depot.

Notice the coupler shoulders show up as a slightly darker green when slid into the clear green payload tube. 
On my build, the green above the yellow coupler band has the Spring Green sprayed onto the outside of the payload tube. The paint sticks fine without roughing up the plastic tube.

It was a simple Scotch Tape mask, tall enough to cover the coupler shoulders inside the tube.


Two of the fins were also sprayed Spring Green.

TIP: Sometimes the Sharpie marked Scotch Tape masks can leave a gray rub mark.
This is easily removed with a damp Mr. Clean Magic Eraser Sponge.

Tuesday, November 9, 2021

Quest Lil' Grunt Build #Q5014, Finished


The above picture was taken after the dull coat was sprayed.
The picture to the right and those below were taken before the dull coat.

The kit box illustration shows four bullet holes on one side. You are supplied with only six bullet holes. I decided to use two on each side in different locations.
Here you can easily see how shiny the stickers are. Before placing the stickers, I gave the dull finish body a gloss clear coat thinking the stickers would adhere and appear clearer on a smoother surface.

In this picture, the upper body has more of a semi-gloss finish after the gloss clear coat was applied.


The Rustoleum Silver Metallic looked great on the nose cone.


Here's the low end.
Any paint overspray was scraped off the engine hook. 

TIP: Why scrape paint off the hook? 
1. It looks cleaner and gives the rocket a finished "trim".
2. That overspray paint on the hook will blister after the first launch and look much worse!

Monday, November 8, 2021

New Quest Q-Pic Initiator Holder, Coming Soon -

Gary Rosenfield post from Facebook:
"We are in the process of upgrading our Q-Jet™ motor retail packages to include a NEW initiator holder...the "Q-Pic™"! The first Q-Pics to be produced will fit all 18mm Q-Jets from 'A' to 'D' size. A larger version of the Q-Pic is being designed to fit the 24mm Q-jets. The colors of the two Q-Pics will be different to allow for easy identification. Q-Pics will be sold in a 6-pack for those customers who would like to use them in previously-manufactured Q-Jets, or with other composite propellant motors with small nozzles. More information will be released in the near future."


These Q-Pics look to be a improvement over the small rubber tube supplied with the Q-Jets.

The picture on the right might be a prototype. You can see the plastic ridges from the 3D print process.