Wednesday, June 19, 2019

Estes Saturn V #1969 Build, Part 38, Interstage Wrap Black

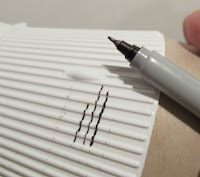
The black bands on the low end are carried up to the interstage wrap.

After you draw the low end black lines, set an aluminum angle down that line. Check to see if the angle is in line with the corrugations in the intertank wrap.

Continue the lines on the middle inter stage wrap. Don't draw a line on the second corrugated wrap or on the middle of the tube. Always double check before drawing any lines. This permanent ink is hard to remove or cover with white paint.


This picture better illustrates the connection of the lines.
Check the pictures on page 12 of the instructions.


Here's something I learned after making up a few Saturn V kits.
TIP: Wrap and tape a piece of paper around the body tube. You'll be handling the rocket body A LOT. Even with the gloss white that is on now, finger oils and dirt will discolor the clean white finish. You won't want to mask and spray some of the white just when you think you are finished with the build.


Assembly time so far:
24:30 minutes previous
   :30 minutes this post
25:00 Total so far

Tuesday, June 18, 2019

Estes Saturn V #1969 Build, Part 37, Wrap Reduction Black Outlines Part 2

Before proceeding -
Please understand this method is not perfect. If you aren't careful with the spray can, paint can still sneak into the low ribs of the corrugation.
I still had quite a bit of touch-ups to do after the masking tape was lifted. The ink outlines help get a sharper line.
If you don't have a steady hand - go with a different method. I don't want to hear from anybody telling me: "You ruined my rocket!"

TIP: One the first pass, draw a line just over the high raised rib, not down into the corrugated rut.
On the second pass connect the small dashes from below (or above) depending on the line.

Enlarge this picture - 
On the left is the first pass just on the raised ribs, it looks like a dashed line.
On the right is the recess of the corrugation. I've filled in the line from the rib recess "going up" to the previous dashed line.

Notice the low rut fill line is started about 1/16" below and goes up to match the upper dashed straight line. You don't have to go as wide as I did in the third picture shown below -


I used a regular fine point pen to designate the upper and lower black bands. I'll go back and widen the line on the ribs so these join in the center with the ultra fine point pen.
Notice I didn't go all the way to the top and bottom of the shroud - this pen point is too wide. The corners will be drawn with the Ultra fine point Sharpie.


You shouldn't go this wide with the Sharpie ink border, a little over 1/16" wide should do it. As I found out, the Sharpie ink isn't as black as the sprayed paint. This ink looks a little "blue-black" under direct sunlight. In the end I had to go back and brush paint closer to the border line.

Here's the color border lines, ready for an easier mask with the black spray paint.


Assembly time so far:
23:30 minutes previous
  1:00 minutes this post
24:30 Total so far

Monday, June 17, 2019

Estes Saturn V #1969 Build, Part 36, Wrap Reduction Black Outlines Part 1

The older (from the Centuri kit) corrugated wraps in the #2157 kit had horizontal raised lines to make the masking easier. I can't see using masking tape going in and out of the raised corrugations.
I'll use a trick learned when assembling the larger Apogee Saturn V. This is a method suggested by John Pursley.

TIP: The Apogee instructions suggest using an Ultra Fine Point Sharpie to outline the black areas. This helps you get a sharp color separation line.
If you don't have patience or a steady hand, you might want to go with Tamiya tape. I wish you good luck getting the tape to settle in and out of the corrugated ribs.


The vertical lines are centered between the raised bumps on the wrap. I did a paper wrap and marked the bumps, then found the center for the vertical lines.
These were marked with pencil on all four sides.


The horizontal center line is 1 1/8" from the bottom of the wrap. I measured and made a pencil mark on each rib. Use only light pencil marks here, no ink pen - ink will bleed through any sprayed paint.

TIP: Only mark the highest point of the ribs, not down into the corrugation dips. It's easier to erase remaining pencil lines if they are only on the high points.
Instead of initially masking, I drew the black outlines with an Ultra Fine Point Sharpie. Not a "fine point" but the smallest tipped Ultra Fine Point style.

After you have figured out which blocks are to get the black color, practice drawing some lines over the ribs. These practice lines will be covered with paint later. Practice a few lines inside the black areas.

Build Time in next post in Part 2

Sunday, June 16, 2019

Estes Saturn V #1969 Build, Part 35, White Base Coats

Mentioned earlier -
This is a large model, hard to get even coverage using a spray can. Spray it in sections.

Here's the 4" diameter lower body. Look to the low end cutouts. There is masking tape, sticky side out, to keep paint out of the engine mount area. There is also tape inside the open top end of the tube.
Normally I'd use a painting wand (a dowel with an engine casing glued on) to paint, but this model is too large for that.
My free hand can go inside the tube on either side to hold the body while spraying.
TIP: Place a plastic grocery bag over your free hand to keep off the paint.

TIP: While the instructions say to paint the model with flat white, I'd recommend a gloss white. You'll be handling this model a lot when masking for the black. Flat paint is a dirt and finger oil magnet. Gloss paint can be cleaned if needed.
Also - Decals stick better on a smooth, glossy surface. Decals will "silver" on flat paint. The clear coat border (over all decals) will be seen. You can always spray a flat clear coat after the model has decals and is finished.

To the left: The shoulder of the Command Module was masked off. A piece of rolled card stock gave me something to hold on to.
Notice the escape motor tube was already seam filled, primed and sanded.

In this new version, the 3rd Stage Wrap totally covers the 3rd stage tube.
TIP: Allow more time before re-coating the white on the 3rd stage wrap. Sprayed on the flat plastic, the paint can't breathe and dry like paint would on a Kraft body tube - from the outside and inside.

I thought I gave it enough time but had three small areas wrinkle up! This slowed down the build as it had to be sanded, sprayed with filler/primer, sanded and sprayed again with the white.


Spray some white, let dry and sand down any glue boogers or rough areas. Spray more white.

On the left is the final (gloss) white before the time consuming black masks.

Assembly time so far:
21:00 minutes previous
  2:30 minutes this post
23:30 Total so far

Saturday, June 15, 2019

What's Going On With The Blog?

I feel like I'm falling behind!
In the past I've tried to handle the posts like a professional cartoonist would. they keep a large backlog of comic strips ready. If there is a vacation, sickness or family emergency, the new strips still have to be published daily.

Presently I'm building a few models for Estes. That takes some time away from my regular blog builds. I hope to feature the new Estes kits on the blog - but can only post them after they are released for sale.
I also have a Semroc Andromeda build in draft form. I also drew up the  instructions for the upcoming kit. Those blog drafts sit in limbo until the kit is released.

So if there is a just a single post in a day - bear with me!

Estes Saturn V #1969 Build, Part 34, RCS Nozzle Painting

Here's how the RCS nozzles look while still on the trees.
TIP: Note the center molding dent. I filled the circular indentation with some medium CA applied with a toothpick. A small drop made a small pool of glue filling the dent.
Here I've got them stuck to some masking tape on a piece of cardboard. These were spray painted white.

Notice how one side of the tree is cut off with nippers.
With a sharp knife, trim off any plastic that might remain on the nozzle face.

TIP: This gives you something to hold onto when you hand paint the nozzles black.
After they dry, cut off the tree and touch up the remaining white nozzle end.

Assembly time so far:
20:15 minutes previous
  0:45 minutes this post
21:00 Total so far

Friday, June 14, 2019

Estes Saturn V #1969 Build, Part 33, Painting TIP & Launch Lugs

The instructions show the upper section assemblies being glued together now, before the model is painted.
TIP: Wait to install the shock cord anchors. You'll find it easier to paint the the 4" diameter lower body assembly separately from the upper body sections.
TIP: Paint these three parts separately, then glue together. You won't have to mask the CM body tube for the silver.


The launch lug is cut into two 1" pieces.
The instructions have you glue the standoffs on the rocket body first, then glue the lugs on top of the standoffs.
TIP: Fill the lugs and standoff pieces separately.
I filled the lugs and standoff with CWF and sanded. This was followed by some filler/primer and sanding.


TIP: Cut the standoffs a little long and glue to the lugs with the standoff overhanging both sides of the lugs. Sand the standoffs to the length of the launch lugs.


The new kit uses some of the illustrations from previous kit instructions.
This drawing shows the lugs glued down the center line at the wrap joints. In the new #1969 kit the wrap seams are at the right of center.

Assembly time so far:
19:50 minutes previous
  0:25 minutes this post
20:15 Total so far