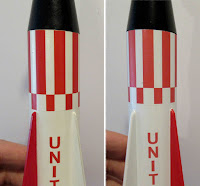
It's always interesting to look back on an older build and evaluate your work over time.
Throughout this post - On the left is the older build, the right side the new build.
Here you can see the difference in the decal opacity. I really don't like that pink look next to the full red color on the fins.
Also notice the thicker fins on the right side or newer build.
I like the wider fin spikes which better fit the thicker fins.
On the left you can see some fin grain and seams in the launch lug. I was probably using sanding sealer then.
My fit and finish of the engine vanes is much better. This time I centered the engine hook in line with the launch lug. The Semroc instructions place the lug and hook as shown on the left.
The shroud is smoother and the paint gloss better.
On the left side is the original build. It looks like I used super glue to adhere the fins. This time I scraped off a line of paint and used white glue.
I now attach the Kevlar to the elastic shock cord inside the lip of the body tube edge. I probably wouldn't get a zipper on this model, but why take the chance!


Wow, the red in those decals is really different! I wonder what accounts for that. Perhaps a different decal material or printer—since the decals are printed not screened?
ReplyDeleteHi Rraeford,
DeleteThe decal print settings may not have been correct. The older kit decals could have been made using a laser printer, these looked like an inkjet print. Typically, you use a "photo print" setting so more ink is used.
Vendors rarely use screened decals anymore - too expensive for a short run of kits.
And, please forgive me, NICE WORK!
ReplyDeleteNo worries, and thanks!
DeleteGood job, such a cool looking rocket, I have an original I would like to build someday. The first version you built looks terrible and I would be glad to take it off your hands....:)
ReplyDelete