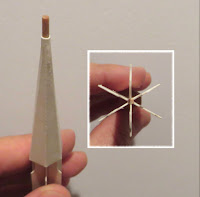
I used my engineers ruler/scale to form the folds all the way to the tip.
I found out later it might look better not to make the fold all the way to the small end. It fits the dowel better if it were simply rounded.
Long tweezers helped to close up the glue tab.
I couldn't see any other way to glue these up.

The interior tab doesn't go all the way to the tip. It'll take some molding to close it up after it is glued over the dowel end.
Dry fit the nose cone and mark the top with a pencil.
Apply a ring of glue on the dowel and a line of glue to the tops of the two heat sinks. slide the cone into place.
The other four heat sinks are glued down the length of the dowel.
Space the root edges evenly down the dowel. The front ends tuck into the folds of the tip piece.
The inset picture shows how some of the heat sinks were miss-cut.
Dry fit all and trim the top angle if needed.
All the rear ends of the heat sinks were lined up even. The angled fronts are covered and didn't need to be even.
Here's a finished missile launcher.
You can see the top of the nose cone cap ends up rounded around the dowel, not creased down the fold lines.
I gave it a coat of CA glue and sanded any remaining folds smooth.
The inset shows the six heat sinks from the rear. They ended up pretty well spaced.


Wow...just...wow!
ReplyDelete