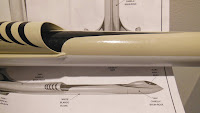
I couldn't figure out why the instructions had you set the black intake decal so far forward.
At the instruction position you could easily see the end of the black decal inside the intake tube. I set it farther back inside the tube.
The curve from the decal better matches the curved lines of the intake tube.

After setting the first long intake decal down, a wrap of masking tape was set around the tube at the tip end. This gives me something to line up the other decal tip.
Sight down from the front to make sure both decals are straight and evenly spaced.
 The wing and rudder decals are the most difficult to place.
Set the decals down dry to get an idea of the spacing along the leading edges. Note: These decals don't really match the curves of the leading edges!
All four decals are long and thin. Have a soft brush handy and be ready to keep the decals wet when re-positioning.
From the previous X. Cruiser post - another change:
I didn't use the largest wing decals. They were just too big filling up most of the wing area.
These smaller decals were meant to be used under the wing. I just thought they looked better. Less is more.


No comments:
Post a Comment