The tape was set down the middle of the wide Sharpie ink outlines. I used a combination of brown masking tape and grocery bags for the larger areas.
When spraying over this mask, the outlined black borders help define just that - the borders. Spray directly over (from the top) the open areas - Don't spray from the sides! The paint can get under any raised area.
I paint scale models with gloss paint so the water slide decals will stick. Decals on flat paint will "silver" and not stick well. You can always hit a glossy model with flat clear after all the decals are in place.
On the right is after the tape was lifted. Get ready - these complex masks over vacu-form corrugations will usually need touch-ups.
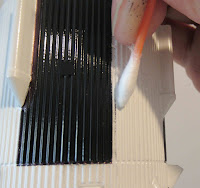
TIP: Below the Q-tip is some black bleed or overspray.
I start with a wet Mr. Clean Magic Sponge. Wet the sponge, squeeze out the excess water. Don't wipe the sponge on the model - Transfer some of the cleaner onto the Q-tip by wiping over the damp sponge.
Rub the cleaner on the overspray to pick up some of the unwanted paint.
On the right is the same area after cleaning off the overspray.
Don't overdue it, you could go right down into the white paint.
You'll have the best luck cleaning off a second color before the paint is totally dry and set in. Start cleaning up the paint soon after lifting the masking tape.


No comments:
Post a Comment