Sunday, February 19, 2017

Nike Goon Build, Part 9, Black Trim


Here's the smaller fins.
A strip was set between the two fin triangles to keep the cuts in line.


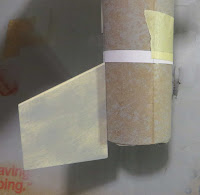
Interesting thing about the trim. Down the root edge there is a thin white line. The squares set on the body tube are separate pieces. You don't have to worry about tucking the vinyl into the root edge.


The upper roll pattern was easy enough.
Wrap a strip all the way around the body tube.
Cut at the mid point below a small antennas and halfway between two antennas.
Lift out every other piece and position below the original line so the corner tips touch.
TIP: You could easily do a checkerboard pattern by repeating this "cut and lift" a few times down the tube. You just have to be sure the vertical cuts are straight and parallel.
There are cut-outs above the large fins. On the original decal sheet they are rectangles with rounded corners.

I didn't try to cut round corners but just cut of small triangular bits off each corner. Visually it'll imply a rounded end. Nobody will notice unless they really look close.

Saturday, February 18, 2017

Nike Goon Build, Part 8, Black Trim

Home print black decals are a bit translucent on white paint. After transfer they sometimes look like a very dark gray.
I decided to hand cut the pieces from Contact Blackboard Covering material. To see it online, CLICK HERE

I've used it many times before, a single roll goes a long way. Its very thin, like a coating of paint. No masking, just cut strips and stick it on the model.

I traced the fins on some copy paper and marked the cut lines.


That template was cut out, traced and cut out of the Contact paper.

This trim won't be an exact match of the Excelsior design or the Estes Nike X kit. It's a Goony so it can just be close enough to imply the original design.


Interesting thing about the trim on the fins. Down the root edge there is a thin white separation line. The squares set on the body tube are separate pieces. You don't have to worry about tucking the vinyl into the root edge.

Better Root Edge Glue Lines TIP


This method was explained in an article the Estes guys wrote on rocket building for Sport Rocketry.

Here's how a glue line looks after applying right out of the bottle.
If this were to be pressed onto the body tube the glue would probably squeeze out unevenly.
Pinch your thumb and index finger together making a small "V" at the top. While the glue line is wet, run the finger "V" down the fillet evening out the line.
Now when the root edge and glue is pressed onto the tube an even amount of glue will adhere down the length of the fin. There should be very little (if any) glue glue visible outside the root edge.

With a cleaner glue joint your fillets will end up smoother.

Friday, February 17, 2017

Nike Goon Build, Part 7, Fin Gluing (Lots Of Fins)


I tend to sand off most of the primer/filler before things are glued together.

Here I'm scraping the glue areas for a better bond.
The fin root scraped area is a little wider than the 3/32" thick fins so the fillet will also stick well.
On some Goons the fins overhand the back of the body tube. On this model it helps with stability.

After one fin was glued on I ran a strip of paper at the top of the root edge so all the fins would be at the same height.

TIP: To get a four finned model that doesn't wobble, glue on three fins. Stand the rocket on those three fins. When gluing on the fourth fin you can (slightly) move that fin up and down the alignment line until all four fin trailing edges make contact with the table top.


That paper strip was slid up to the bottom position of the next row to align the bottom of the smaller fins.

A popsicle stick (craft stick) was clothes pinned on the side of the two fins. This kept both fins in vertical alignment.


Here's how the model looks now, a Goony ready for paint.

Thursday, February 16, 2017

Crazing Paint? TIP

A builder posted this picture on Facebook. I'm not showing this to embarrass anybody. The information below might help somebody with their paint issues.

We've all been there. Imagine the frustration, especially on a build this complicated - The Estes QCC Explorer!
The builder had used Rustoleum 2X primer and followed with Rusto 2x Gloss White. As shown in the picture, the paint crazed.

I didn't post a response on Facebook.  Twenty others already had, some giving bad information. My answer would have just clouded the waters.
On response said this is what happens when you put lacquer over enamel, or vice versa. Not true! Lacquer will dissolve enamel but you can use enamel over lacquer.
Another suggested using a Dremel tool to remove the paint. A Dremel would be too aggressive and could even go right through the body tube.

Still another response was to simply wipe off the wet paint and start over. If you tried to wipe off wet paint you'll have a bigger mess to clean up. It's best to let it dry, sand it down and spray again.

The real problem here - the builder probably didn't read and follow the re-coat time instructions on the paint can. I always check the drying time recommendations especially if I am using a new brand of paint.
Most recently I had to use some Valdspar spray paint. I rarely use that brand but they had the color I needed.
The can specified the temperature and drying times. "You can re-coat within one hour or wait 24 hours before re-coating."
I would assume the builder painted again after the one hour. The new wet paint reacted with the drying paint and made it pucker up. If the first paint has started to "skin" over (half dried) a new wet coat will cause the crazing.

Notice how most of the wrinkling happened on the body tube, not on the balsa. Balsa "breathes" more so the paint dried faster on the wood than a sealed body tube would. Nose cones take even longer to dry!

Painting is a crap shoot. Some days it goes great! On another day, the paint manufacturers change the formula and you've got to relearn everything!

Nike Goon Build, Part 6, Same Kit Differences

The two Nike Goons under construction were made from two different Baby Bertha kits.
Both had the same face card but they were obviously from two different runs.

At first the nose cones looked the same.
The cone on the left had very little molding seam, if any. The cone on the right had seam marks, highlighted with a pencil.

The shoulder bases were different. The cone on the right had a sharper taper and a smaller hole on the bottom.

When slid into the body tubes, one had a tighter fit.


The body tubes were also different.
The tube on the left was rougher with a definite spiral seam.
The right side tube had no seam! Well, there was one but it was so tight I didn't fill it with CWF. A shot of primer/filler and sanding was all it needed to fill it.

I checked the kit production date embossed into the stick on "decal".
One was 8/15/11, the other 1/25/13.

Wednesday, February 15, 2017

Nike Goon Build, Part 5, Engine Mount


On the Goony models the engine mount is set in farther up in the body tube. This puts the center of gravity forward and makes for better stability.
The bottom bend of the engine hook is even with the bottom of the BT-60 tube.


It'd be too hard to tie the Kevlar line around the back end of the engine tube with the mount set forward.
TIP: To get the right sized loop, tie the Kevlar around a BT-20 sized tube. Use a square knot. Leave a 1/2" tail on the end so you have something to grab onto when you want to check the condition of the line.

This loop and knot shouldn't be overly tight around the tube. You should be able to move the engine hook with the Kevlar line over it.


The body tube is short. You'll have to pull the end out the back to tie the attachment loop in the line.


After the loop is tied pull it through the mount and back to the top of the tube.