

They'll look okay as is, but there is a good work-around.
Here I've taped the decal to a window with bright sunlight behind it.
A white decal sheet was set on top of that.
Trace just inside the Star and Bars outside blue border line.
Cut out the white decal. On this type of use, no clear coat is needed on the white.

Set down the white piece. Without the clear coat it will transfer but feel a little slimy. Let dry before laying down the kit decal on top.
Set the star and bars decal over the white piece. Done!
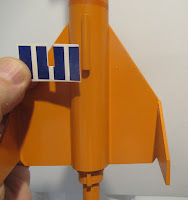
On the back side the roll pattern decal will need to be notched to work around the launch lug.

I should have looked ahead and maybe glued the launch lug higher up on the tube.
TIP: It's easier to notch a decal while it is still on the backing sheet - before soaking in water. Just be careful cutting those inside notch corners. Don't give the decal any reason to tear.


After the decal dries, the overlap on the body tube is cut with a single edge razor blade.
Set the blade into the glue fillet and use no more pressure than needed to cut through the thin decal. Don't cut into the paint.
Carefully remove the overlap using your knife blade tip.
Chris: What do you buy and use for the white decal sheet?
ReplyDeleteJohn
Hi John,
DeleteRecently I've been buying my white and clear decal paper from world-paper.com.