

Apply a line of glue around the inside edge and press in place.
Check to be sure it is level and even before the glue sets up.

The engine mount tube gets a line of glue inside the end to slip around the engine block already in place.
Slide in and over the engine block.
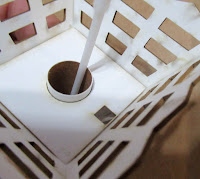
Some glue will be pushed up inside the tube at the bottom of the engine block.
TIP: It's a good idea to remove as much of the glue as you can. I used a long Q-tip to remove the excess glue.
It's probably not a concern with this rocket as the engine is ejected. But on other models, a hot engine could melt glue on the inside of the engine mount tube making it hard to remove.
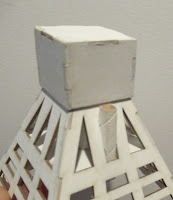
The cap is in place -
The square launch lug is glued into the rectangular hole and through the centering square inside. The top is even with the low edge of the cap assembly.
Did you think about sanding an angle into the cap pieces for a better look when assembled? I know it would push the engine further back, along with the cg, but itc was just a thought I had.
ReplyDeleteHi Metal,
DeleteI'm sure it would be a smoother transition if the cap pieces had a sanded angle. It didn't occur to me. But the finished look isn't bad, just a bit more blocky.