Wednesday, July 22, 2015
Estes Mercury Redstone #1921 Build Part 18, Fin Marking Guide
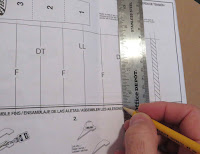
I didn't want to cut up the instructions for the fin marking guide.
The fin, lug and DT lines were extended beyond the edges of the marking guide with pencil.
A slightly smaller piece of copy paper was taped over that.
Using the extended lines, new lines were drawn on the overlay paper.
This was cut out and wrapped around the tube for marking.
Problem: The ends of the guide didn't match up! The original on the instruction sheet was off.
I ended up making my own guide by wrapping paper, folding into fourths and marking.
Here's the guide in place. The marks were transferred.
The engine hook and launch lugs were in line on the same side.
Subscribe to:
Post Comments (Atom)


I can NEVER get the printed fin marking guides to meet properly when wrapped around a body tube. Not just Estes, but lots of different manufacturers.
ReplyDeleteThis trick of wrapping the body with paper, folding it in quarters, and using the folds to mark was in this blog years ago and I've used it ever since. Thanks for passing it along!!
Now if you could come up with an easy way to fold a paper ring into thirds...
Hi Joe,
DeleteIt's pretty frustrating when most all the wrap around fin marking guides don't fit.
I've tried to fold a three fin wrap without much luck. I usually go to payloadbay.com and print out a three fin guide there.
Here's a diagram:
Deletehttp://modelrocketbuilding.blogspot.com/2016/01/diy-three-fin-marking-guide.html?showComment=1452447262531#c5701986747508952516
Here's a technique that's often covered in Euclidean Geometry course in the chapter covering "constructions."
ReplyDeletehttp://www.mathopenref.com/constdividesegment.html
Ask anybody who has taken a mechanical drawing or drafting course (pre-computerization) and they'll show you a similar technique.
Hi Naoto, I'm a mechanical engineer with a couple of mechanical drawing classes in my past, and there is actually a much easier way to divide a straight line into equal parts using a ruler, right triangle, and a pencil.
DeleteHowever, that's not the problem with a strip of paper taped around a tube. The real challenge is to be able to fold it into thirds similar to folding one into quarters by folding it in half twice. Show us how to fold a ring of paper so there are 3 equal parts and you'll be a hero among model rocket builders. :)
If you're trying to draw the style of fin alignment guide where it is a circle over which you place the end of a body tube, then mark location of fins. then technique discussed in drawing an n-pointed star within a circle might help:
ReplyDeletehttp://www.hyperflight.com/pentagon-construct.htm
On a slightly different topic -- but does relate to model rocketry. Look up a book on mechanical drawing, then look in the section covering "developments" or "developing shapes". There you'll learn technique on how you can make some useful stuff like:
ReplyDelete* transition sections -- even for things like square to circle!
* "tilted" cone (think nosecone as seen on some booster rockets where the pointed tip is offset)
* making templates for cutting body tube -- for intersections with other shapes. Ever want to figure out how to make that diagonal cut on the body tube?
Hi Naoto,
DeleteNo doubt, a background in mechanical drawing would help us all!
I did look up the websites you gave, great information there. In school I remember dividing up a circle with a compass to make five pointed stars. Sort of the same idea.
Thanks again, I'll work on it!
Hi Chris. What does ‘DT’ stand for on the marking guide? Does it have something to do with the vertical United Stated decals?
ReplyDeleteHi Jimmy,
DeleteI would think the DT is short for "Detail". That line is where the plug pieces are centered between two fins. The old Centuri instructions called them "Pull Out Plugs". The original Estes M.R. kit called them "Plug Sockets". The vertical UNITED STATES decals as set directly over the leading edges of the fins, not between them.