

Masking over corrugations isn't easy. I wish I could take credit for this technique - I learned it when I put together two Apogee Saturn Vs.
This is the method that works for me. You are welcome to use traditional masking.
TIP: The edges of the black areas are outlined with Ultra Fine Sharpie pens. The black outline is widened with a Fine Point Sharpie.
The wide black Sharpie edges give you a advantage when things are masked for the black spray paint. A small bit of overspray won't show with the black Sharpie border.
If you feel you don't have a steady hand, you can still do some traditional (but careful) masking -

Start with the easier black band at the top of the middle body tube.
Measure and mark the 15/16" space with many close pencil marks going around the wrap.
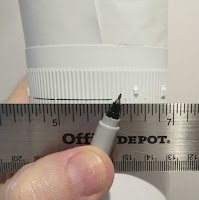
Now draw a straight line around the tube using Ultra Fine Point Sharpie.

Connect all the pencil marks with a straight line.
I used a 12" metal ruler, drawing and connection many short 1/4" segments.

Come back and widen the line with a Fine Point Sharpie going towards the middle of the black area. Make a black border about 1/8" to 3/16" wide.
The top black line is the open end of the tube, I have paper set inside the end.
TIP: Notice at the bottom of the picture - I have taped a sheet of paper around the tube. You will be handling this tube a LOT! Protect the finish. Finger oils will discolor the white paint and leave you with difficult touch-ups.

You might think you could do all the black areas with the Sharpie, but I wouldn't recommend it. It could turn out blotchy with a hint of blue.
When the middle areas are sprayed black, the Sharpie borders will blend in, especially after the final dull coats.
Build time:
Spray/Sand Main Body Section: 30 minutes
Sharpie Outline Top Band: 40 minutes
Total build time so far: 14 hours, 35 minutes
One thing that you do have to be careful about with Sharpie ink -- some solvents could cause it to bleed.
ReplyDeleteHi Naoto,
DeleteTrue - but I didn't have any problems with sprayed paint on the Sharpie border lines - no bleeding.
When in doubt, it's probably a good idea to test it before you do this on your model.
DeleteHad this happen on a model aeroplane (a flying "stick-and-tissue" type) where I'd used a sharpie to mark out the panel lines. The solvent in the dope (a lacquer often used on model aeroplanes) caused the ink to bleed.