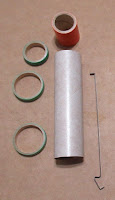
Pretty standard, at the top is an 1" orange spacer if you use the D12-3 engine.
You are directed to make a slit for the top bend of the engine hook at 3 3/8" from the bottom of the tube.
Note the engine block will end up recessed 1/16" from the top of the tube if the slit and top bend of the hook are at the 3 3/8" mark.
TIP: The instructions don't mention it, but I prefer to glue the top centering ring just over the top of the engine hook.

Here you can see the recessed engine block glued in and resting on the top bend of the engine hook..
Gluing the ring over the engine hook can prevent the hook from tearing the engine tube and loosening up.
Normally I'd glue the top ring overlapping the engine hook and tube slit, but these builds were glued up per the instructions.
Build time:
Engine Mt. Assembly - 30 minutes
Total build time so far: 3 hours


No comments:
Post a Comment