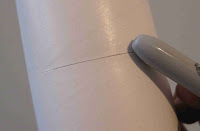
You'll be working about an inch at a time with the medium CA glue and Q-tips. Have plenty of Q-tips ready. You'll use them once and throw it away.
Have a round burnisher handy (like the back end of a Sharpie pen) to smooth out the seam.
Chances are there isn't much glue under the seam area at the tube joint. As there isn't glue holding down the edges, they can lift and be uneven.
Lay a drop of CA glue onto a waterproof surface (like wax paper so it won't soak into the work surface.)
Pick up some glue on the Q-tip and rub it onto the seam area only covering about 1" of the seam and surrounding body tubes. Keep the CA applied close to the joint.

Quickly pick up the white back end of the Sharpie pen and burnish over the still wet CA glued seam.
Rub quickly, don't glue the pen to the tube!
Continue with the CA glue and burnishing, 1" at a time all the way around the joint.
This does two things -
It glues down the seam area to the coupler.
And, lets you compress any raised body tube edges down and even with the other body tube end.
You'll find the new, even edge easier to fill and smooth out.


No comments:
Post a Comment