This technique was covered in an earlier post and in an article written for the Apogee Peak Of Flight newsletter.
This kit is different, you are supplied with a Nose Cone Masking Guide used for cutting the correct mask arc.
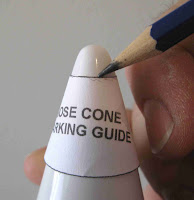
A nose cone marking guide is provided in the kit.
Cut it out, form and close with tape.
Set on the nose cone and trace a very light pencil line around the top.
(Don't use any pressure when drawing the line. You don't want to scar a line in the balsa nose cone!)
This pencil line will assure the painted area mask will be straight around the tip, not at an angle.
Take off the masking guide and open it up.
Here I've taped the paper guide to the Outside of my glass patio door.
On the Inside of the glass a strip of Scotch tape is placed over the small end of the masking guide.
The guide is taped at an angle to make the knife cut easier.
Cut around the small arc of the guide, tracing over the masking guide edge (on the outside of the glass) with a sharp knife.
Try to make it a clean, round cut.
Before pulling up the cut tape, make another cut to the left of the small arc.
This cuts the tape into a masking strip about 1/8" wide.
This is the 1/8" wide mask strip of Scotch tape set right up to the pencil line.
It's a really small mask area on a big nose cone.
Sure you could just brush paint the tip, but a sprayed mask will end up being a smoother coat.
Masking tape is set over the clear tape near the edge.
A plastic grocery bag is taped below that covering the rest of the white nose cone.
After spraying with Aluminum paint. (I prefer the aluminum over using silver. It won't tarnish like silver does.)
This shows the nose cone after the mask is removed.
I did have to "push" some small paint edges back using the tip of my hobby knife.


No comments:
Post a Comment