The original kit used a pre-bent wire to hold the elevator down during boost.
The new kit uses three pieces of laser-cut balsa. Here's a dry fit of the assembly.
I don't sand these down before gluing. The will be sanded flat and even after the glue is dry.
Glue is applied to the flat sides of the two vertical pieces. Check the bottom fit against the BT-20 pop-pod tube.
Clamp the two pieces together for drying.
TIP: Don't sand down the rounded side that glues to the BT-20 pop pod tube. The fit is correct to hold down the elevator without sanding any of the burnt curve. Later I ended up having to build up the curve to make it a bit higher.
The top horizontal "T" shaped piece is glued on and all three are sanded clean together.
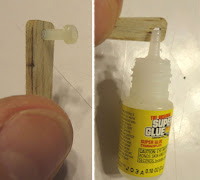
The nylon screw is screwed into the small hole. The threads on the screw will cut threads into the balsa. Remove the screw.
The screw threads are strengthened with a drop of CA glue set into the hole.
Before the glue has a chance to dry, soak up any excess with a quick turn of a Q-tip in the hole.
After that dries, reinsert in the nylon screw again to check the fit. You should end up with a very strong hole with clean threads.


No comments:
Post a Comment