Thursday, April 6, 2017
PML Lunar Express Build, Part 3, Engine Mount
Compared to a LPR rocket, in MPR the engine mount uses beefed up parts. Plywood centering rings and a heavy engine tube.
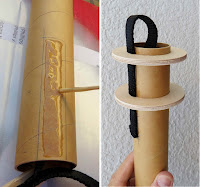
The centering rings are epoxied onto the motor tube with the shock cord strap slots lined up.
The black shock cord strap is epoxied flat against the engine tube. I pencil traced around the strap before applying any glue. This gives me an accurate outline of the glue areas.
I try to make the interior build as clean as the outside surfaces. I know what a few are thinking - why bother? Nobody sees the inside! That's fine. It's just the way I do it.
I look at the interior assemblies as good practice for the outside surfaces. Using Epoxy is like assembling a rocket with running honey. It goes everywhere! Gluing the strap and centering ring fillets gives you a chance to see how epoxy flows and runs.
Subscribe to:
Post Comments (Atom)


I know you don't use epoxy much and aren't a big fan, but you can use fillers, like colloidal silica and chopped fiberglass to thicken up the epoxy for various jobs. There is some great information on the West Marine site and some great videos on the subject they produced.
ReplyDeleteHi Metal,
DeleteI do have some small bead epoxy fillers but I've read where adding them diminishes the strength of epoxy a bit. I'd be concerned using them on internal engine mounts or internal fillets, I want full strength there. On outside fillets they have their place for easier forming and sanding.
I think this is a high power rocket and not a mid-power. The manufactures weight is 58oz, which exceed the 1500 gram lift off limit even without the motor. Also 38mm motors, and fiber glass are more hpr than mpr.
ReplyDeleteAs alway I look forward to your tips and how this one will turn out. And thank again for a wonderful blog.
Hi Bradley,
DeleteYou're right! It's a 38mm engine mount tube. Looking at the height of this model I think of it more as a "mid-power" size.
Hey Chris,
ReplyDeleteYou really don't give yourself enough credit. Been reading your archived posts about applying epoxy: seems like you have the technique down ( masking tape, denatured alcohol, nitrile fingertip glove, etc. ). Myself, I'm on the learning curve. One kit I recently built had a micro syringe enclosed. Got the best results so far using that. Actually more economical in terms of less cleanup and time saved for the cost of a disposable syringe. Eagerly looking forward to the rest of the build.
Thanks BAR,
DeleteI just don't use epoxy often enough to get good at it! I still feel I'm just starting on the techniques.
I built a MPR recently (the Sky Wolf by Sky Pyrates), and it used a similar technique anchoring the shock chord to the MMT with epoxy.
ReplyDeleteThe instructions had you wrap the dipped shock chord and motor mount in electrical tape to squeeze the Kevlar tightly to the motor tube. I worried it would get stuck, but it did the trick, and came off pretty easily. The whole thing was pretty solid after that, and made me think I might try that trick on other MPR builds (like a couple Estes PSII kits I haven't started yet).
Hi Daniel,
DeleteI understand some vendors have you tie a loop in the shock cord and simply epoxy that inside the upper end of the body tube. I wouldn't think it would hold but many have claimed it works very well.